
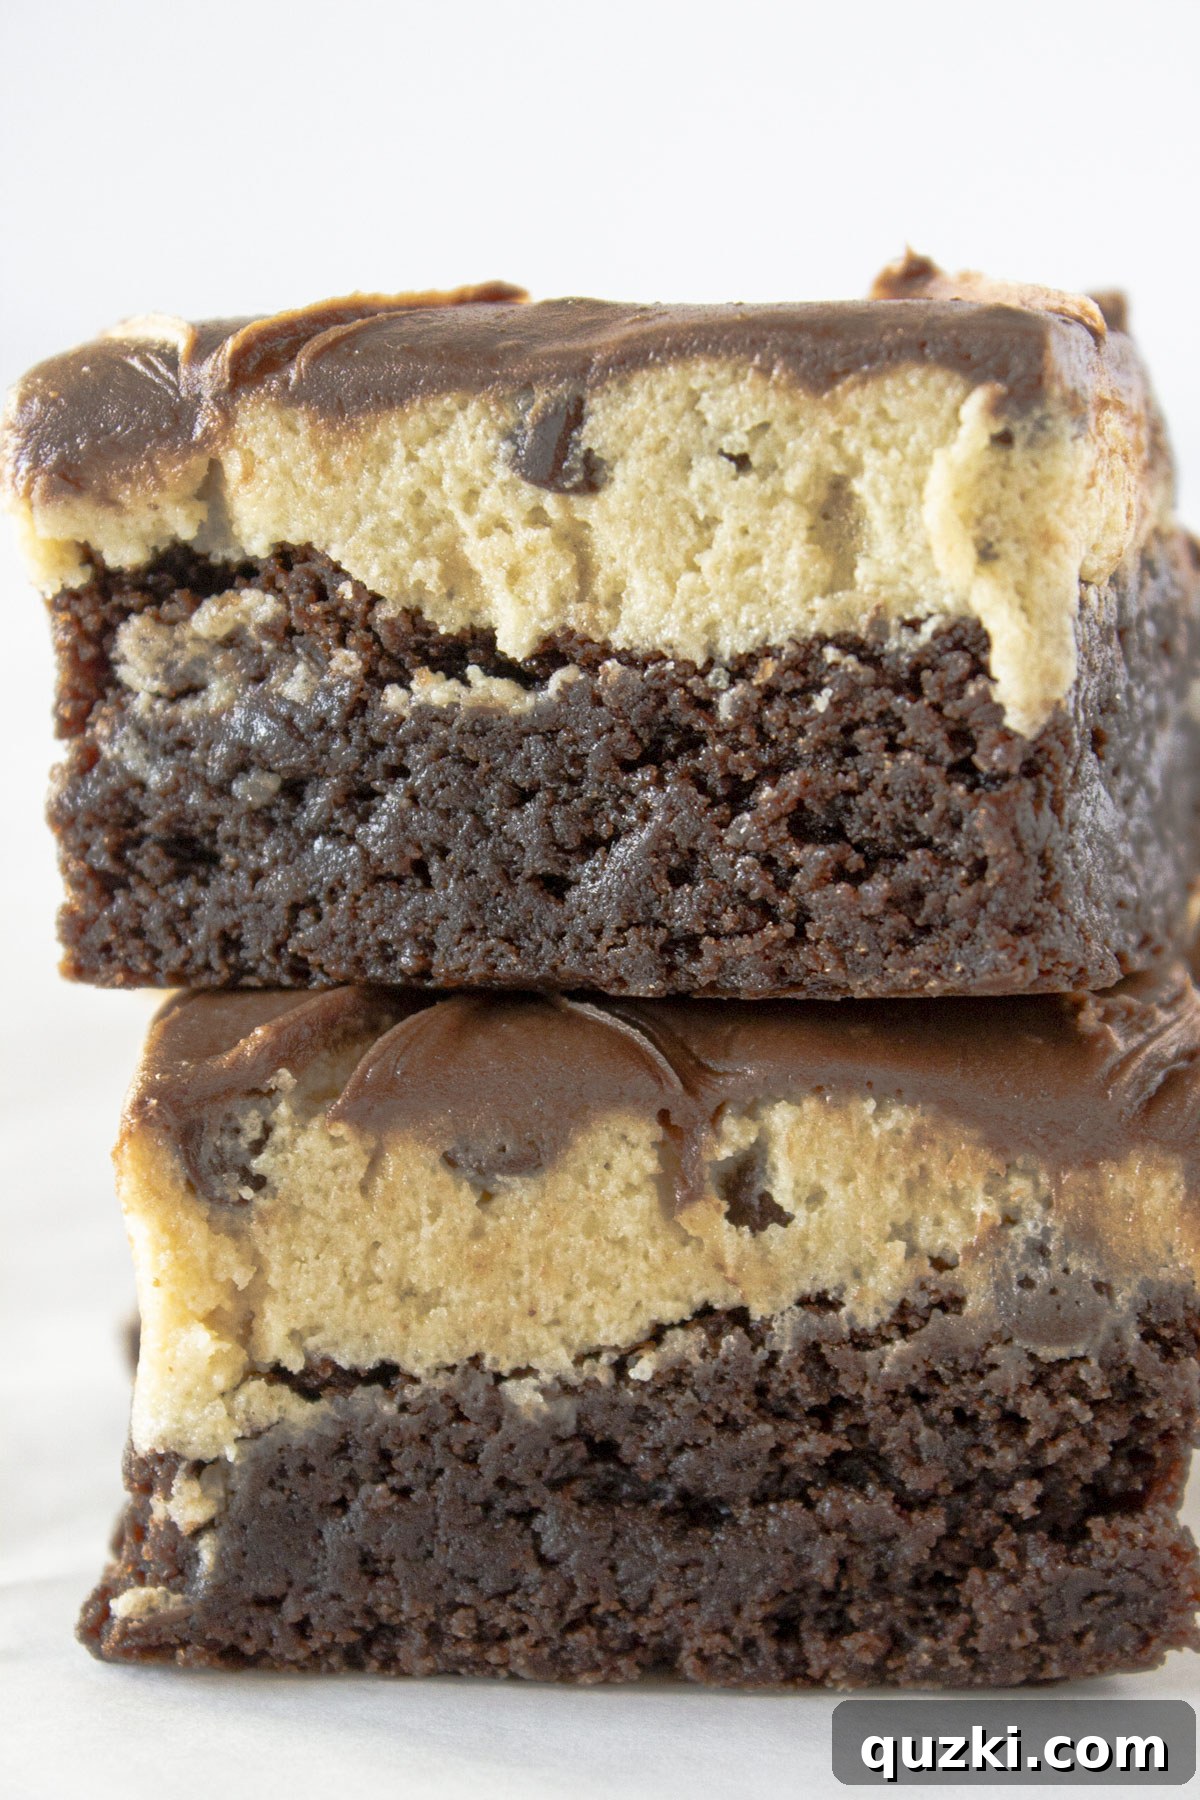
Welcome to a recipe that holds a truly special place in my heart – the **Ultimate Cookie Dough Brownies**. This isn’t just any brownie recipe; it was a consistent bestseller when I ran my bakery, captivating customers with its irresistible charm and decadent layers. Each bite offers a harmonious blend of textures and flavors: a rich, intensely fudgy brownie base, crowned with a generous, creamy layer of homemade edible chocolate chip cookie dough, and finished with a silky-smooth, shortcut chocolate frosting. It’s a dessert symphony that had people returning daily for more, and for very good reason.
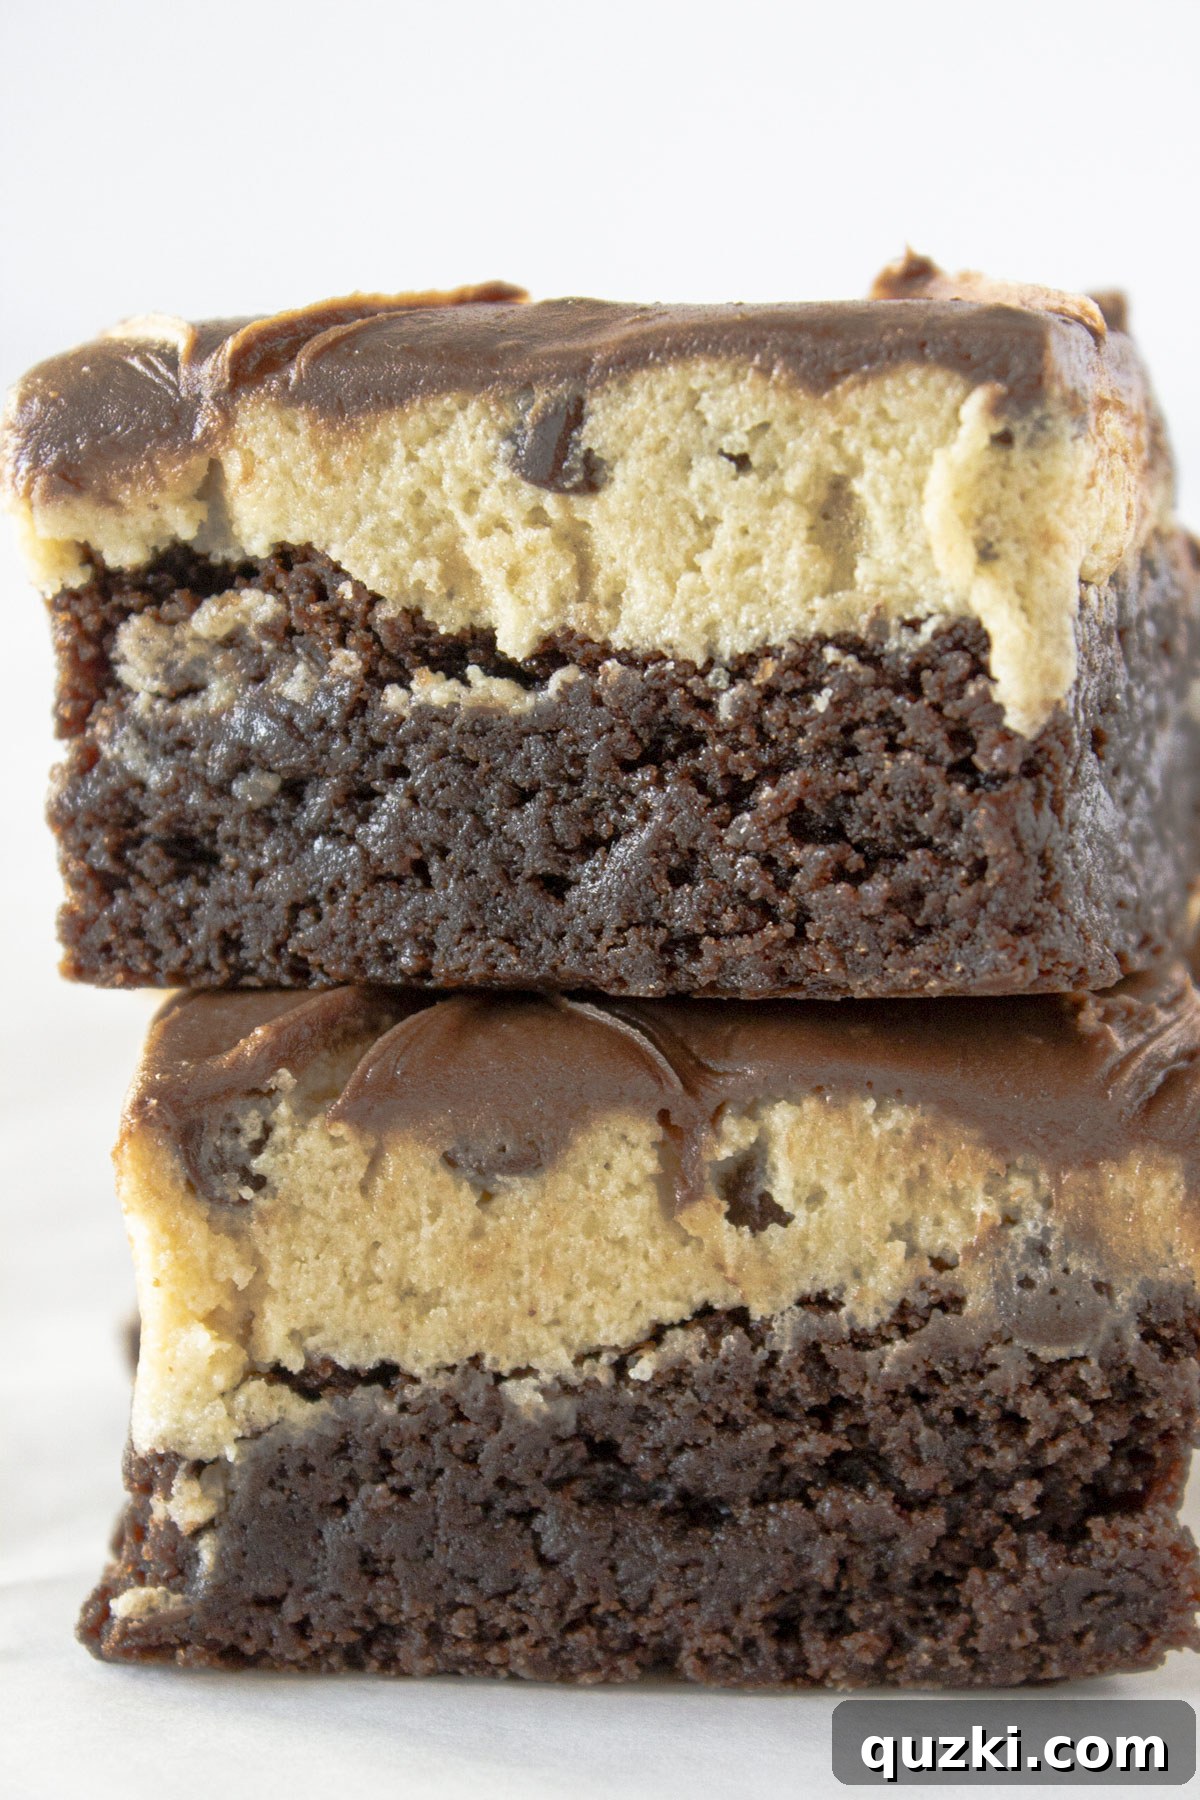
This recipe transforms simple ingredients into an extraordinary treat. It’s a perfect balance of chewy, creamy, and intensely chocolatey goodness that evokes a sense of comforting nostalgia while feeling utterly luxurious. Whether you’re preparing it for a grand celebration, a casual get-together, or simply to satisfy a serious sweet craving, these cookie dough brownies promise bakery-style perfection right in your own kitchen. They’re a guaranteed crowd-pleaser, delivering an over-the-top dessert experience in the best possible way. Get ready to indulge in a truly spectacular dessert that’s easier to make than you might think!
Table of Contents
- Why These Cookie Dough Brownies Are The Best
- Essential Ingredients for Irresistible Cookie Dough Brownies
- Brownie Layer:
- Edible Cookie Dough Layer:
- Chocolate Frosting Layer:
- Step-by-Step Guide: How to Make Cookie Dough Brownies
- Expert Baking Tips for Perfect Cookie Dough Brownies
- Recipe FAQs
- More Amazing Dessert Recipes to Try…
- Ultimate Cookie Dough Brownies Recipe
Why These Cookie Dough Brownies Are The Best
There’s a reason these Cookie Dough Brownies were a star performer at my bakery and continue to be a beloved recipe for countless home bakers. It’s more than just the combination of two favorite desserts; it’s about the intentional design of each layer to create a symphony of flavor and texture that truly stands out.
- Unbeatable Fudgy Brownie Base: We start with a foundation of deep, dark, and incredibly fudgy brownies. The secret lies in a quality fudge brownie mix enhanced with rich melted butter, ensuring a dense, moist, and chewy texture that perfectly complements the layers above.
- Perfectly Sweet Edible Cookie Dough: Forget raw eggs! Our cookie dough layer is specifically designed to be safe to eat and utterly delicious. It’s thick, creamy, and boasts that classic chocolate chip cookie flavor, made even better with a thoughtful blend of sugars and mini chocolate chips for optimal distribution in every bite.
- Harmonious Shortcut Frosting: The final touch is a thin, smooth layer of milk chocolate frosting. This isn’t meant to overpower but rather to add another dimension of chocolatey flavor and a delightful textural contrast, tying all three components together beautifully without being overly sweet.
- Easy Yet Impressive: Despite looking like a gourmet creation, this recipe utilizes smart shortcuts, like a brownie mix and store-bought frosting, to make it accessible for bakers of all skill levels. You get maximum impact with minimal fuss.
- Crowd-Pleasing Perfection: From birthday parties to potlucks, these brownies consistently disappear first. Their decadent appearance and familiar, comforting flavors make them universally appealing and a memorable addition to any dessert table.
Each component is carefully chosen and prepared to contribute to an overall dessert experience that is truly greater than the sum of its parts. Get ready to create a dessert masterpiece that will earn you rave reviews!
Essential Ingredients for Irresistible Cookie Dough Brownies
Crafting these sensational Cookie Dough Brownies begins with selecting the right ingredients. While some shortcuts are utilized to simplify the process, quality ingredients ensure the best possible flavor and texture for each distinct layer. Here’s a detailed look at what you’ll need, along with notes on why each component is key:
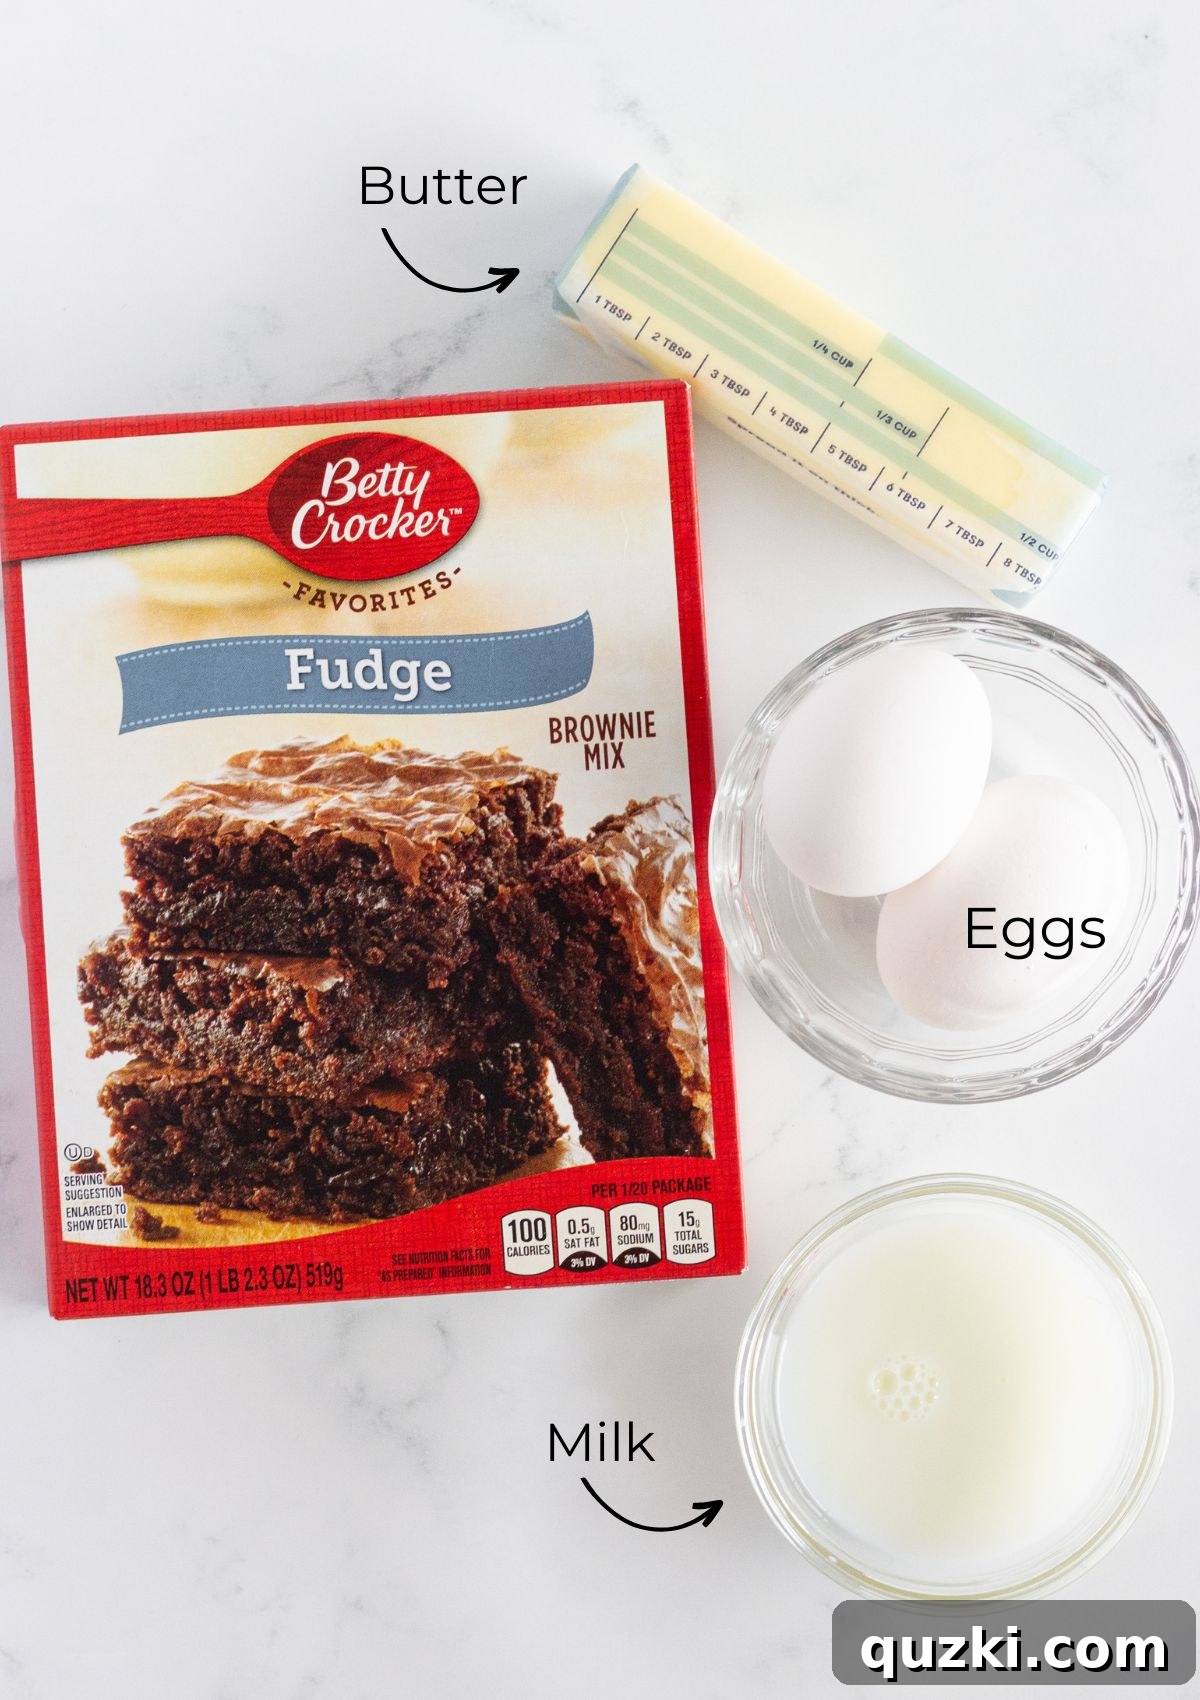
Brownie Layer:
- Fudge Brownie Mix: Opt for a high-quality fudge brownie mix. There are many varieties available, but the “fudge” type is crucial for achieving that dense, intensely chocolatey, and wonderfully chewy texture that forms the perfect foundation for our brownies. It contributes significantly to the overall richness.
- Butter (Melted): While most brownie mixes call for vegetable oil, substituting it with melted unsalted butter elevates the flavor profile significantly. Butter imparts a rich, creamy, and luxurious taste that oil simply cannot replicate, resulting in a superior brownie.
- Eggs: Eggs are essential for structure, moisture, and binding the brownie batter. They help create a cohesive, chewy texture.
- Milk: A small amount of milk (any type works) helps to bring the brownie batter to the perfect consistency, ensuring a moist and smooth mix.
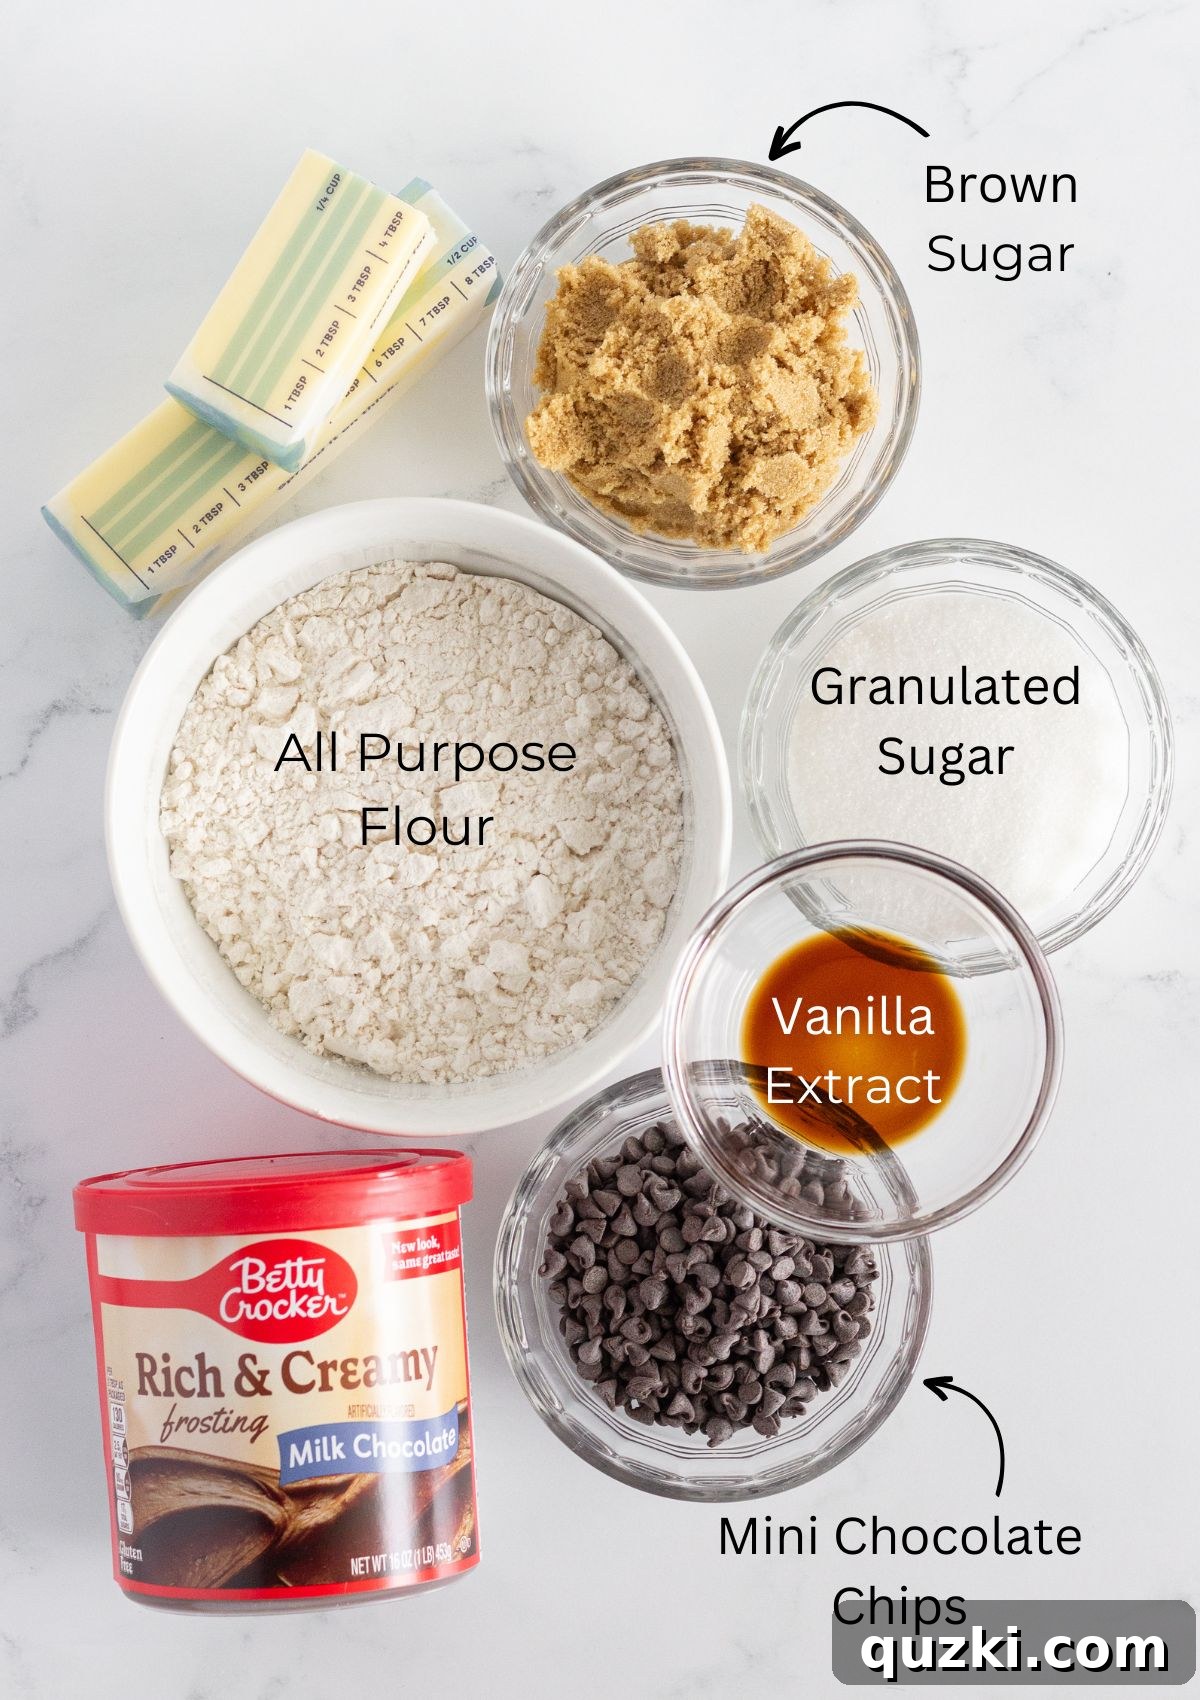
Edible Cookie Dough Layer:
- Butter or Margarine: Both unsalted butter and margarine work exceptionally well for the cookie dough layer. Interestingly, many bakers find that margarine can impart an even more distinct and delightful cookie dough flavor, contributing to a wonderfully creamy consistency.
- Brown Sugar and Granulated Sugar: Using an equal blend of both brown and granulated sugar is key to achieving the classic depth of flavor and perfect sweetness in the cookie dough. Brown sugar adds moisture and a subtle caramel note, while granulated sugar contributes to the overall sweetness and texture.
- Vanilla Extract: Pure vanilla extract is crucial for enhancing the warm, sweet notes of the cookie dough and providing that signature bakery aroma and taste.
- All-Purpose Flour (Heat-Treated): Since this is edible cookie dough, the raw flour must be heat-treated to eliminate any potential bacteria, making it safe for consumption. This step is non-negotiable for food safety.
- Mini Chocolate Chips: Using mini chocolate chips instead of standard-sized ones is a deliberate choice. Their smaller size ensures that every single bite of cookie dough has just the right amount of chocolate, providing a delightful crunch without overwhelming the delicate texture of the dough.
Chocolate Frosting Layer:
- Store-Bought Milk Chocolate Frosting: A high-quality store-bought milk chocolate frosting provides a convenient and delicious finish. The key is to apply it in a very thin layer to enhance the overall chocolate experience without making the brownies overly rich or heavy.
Refer to the complete recipe card below for precise measurements and quantities. Gathering all your ingredients beforehand will ensure a smooth and enjoyable baking process.
Step-by-Step Guide: How to Make Cookie Dough Brownies
Creating these sensational Cookie Dough Brownies is a straightforward process, broken down into three main stages: preparing the brownie base, making the edible cookie dough, and assembling the layers. Follow these detailed steps for a truly incredible dessert.
Part 1: The Fudgy Brownie Layer
- Prepare Your Pan and Oven: Begin by preheating your oven to 350°F (175°C). Prepare a 9×9 inch baking pan. For effortless removal and perfect squares, generously spray the pan with non-stick cooking spray, or better yet, line it completely with parchment paper, leaving an overhang on the sides. This parchment “sling” will be your best friend later!
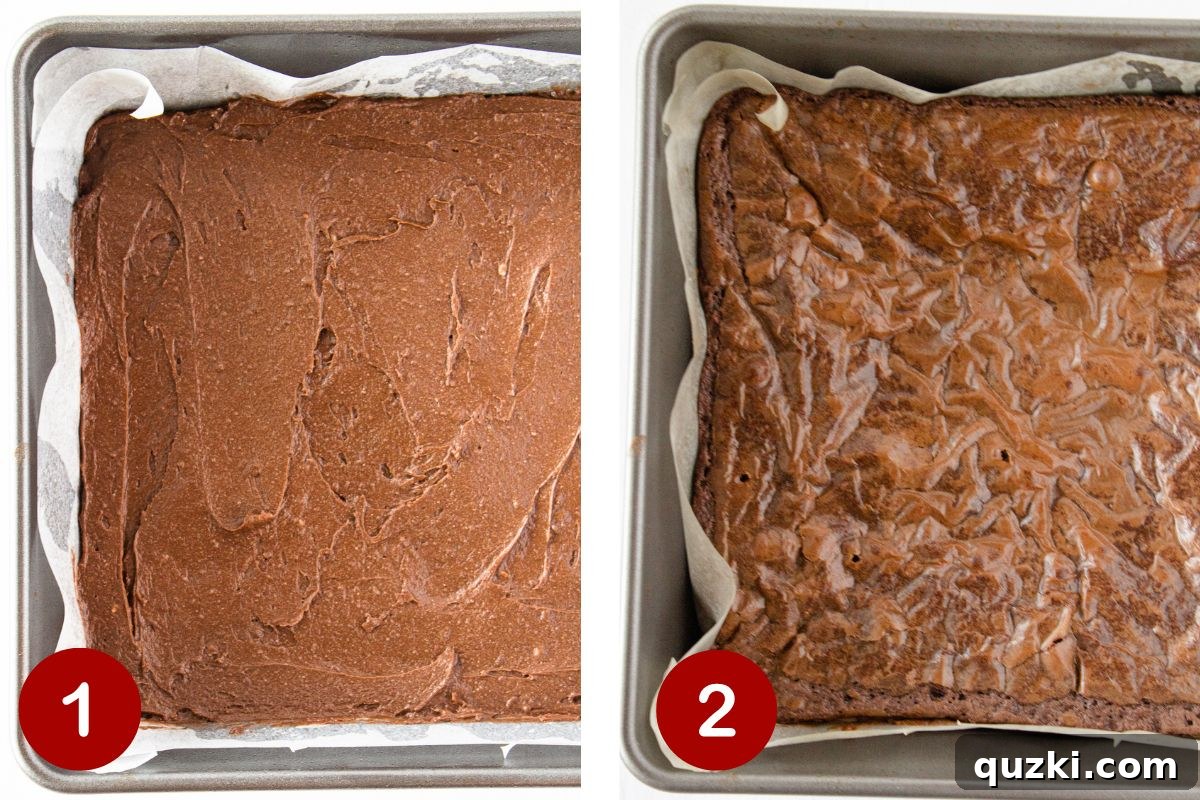
- Mix the Brownie Batter: In a large mixing bowl, combine the fudge brownie mix, melted butter, eggs, and milk. Using either a hand-held electric mixer on low speed or a sturdy spatula, mix until all the ingredients are just incorporated and no dry spots remain. Be careful not to overmix; a few lumps are perfectly fine and often result in a chewier brownie.
- Bake to Perfection: Pour the prepared brownie batter evenly into your lined 9×9 inch baking pan, spreading it out with a spatula to ensure a consistent layer. Bake for approximately 37-40 minutes. You’ll know the brownies are ready when the edges begin to pull away slightly from the sides of the pan, the top appears shiny, and a toothpick inserted into the center comes out with moist, fudgy crumbs attached (not wet batter, but not completely clean either, which indicates doneness for fudgy brownies).
- Cool Completely: This step is absolutely critical. Once baked, remove the brownies from the oven and place the pan on a wire rack to cool completely. Do not rush this process! The brownies must be entirely cool before adding the cookie dough layer, or the warmth will melt the dough. This could take several hours, or you can even bake them the day before.
Part 2: The Edible Cookie Dough Layer
Once your brownies are cool, it’s time for the star layer: the delicious and safe-to-eat cookie dough.
- Heat-Treat the Flour (Crucial Step): Before starting, you must heat-treat your all-purpose flour to eliminate potential bacteria. Spread 1 cup of flour evenly on a microwave-safe plate or baking sheet. Microwave on high for 1 minute and 15 seconds, stirring every 15 seconds, until it reaches 160°F (71°C) and is fully cooked. Alternatively, bake in a 350°F (175°C) oven for 4-5 minutes, stirring every minute, until it reaches 160°F (71°C). Allow the flour to cool completely before using.
- Cream Wet Ingredients: In a medium bowl, cream together the softened butter (or margarine), granulated sugar, brown sugar, and vanilla extract until the mixture is light, fluffy, and well combined. An electric hand mixer works best for this.
- Combine Dry and Wet: Gradually add the cooled, heat-treated flour to the creamed mixture. Mix on low speed until a thick, uniform dough forms. Scrape down the sides of the bowl as needed to ensure everything is fully incorporated.
- Fold in Chocolate Chips: Finally, gently fold in the mini semi-sweet chocolate chips using a spatula. Ensure they are evenly distributed throughout the dough, guaranteeing chocolatey goodness in every bite.
Part 3: Assembly and Finishing Touches
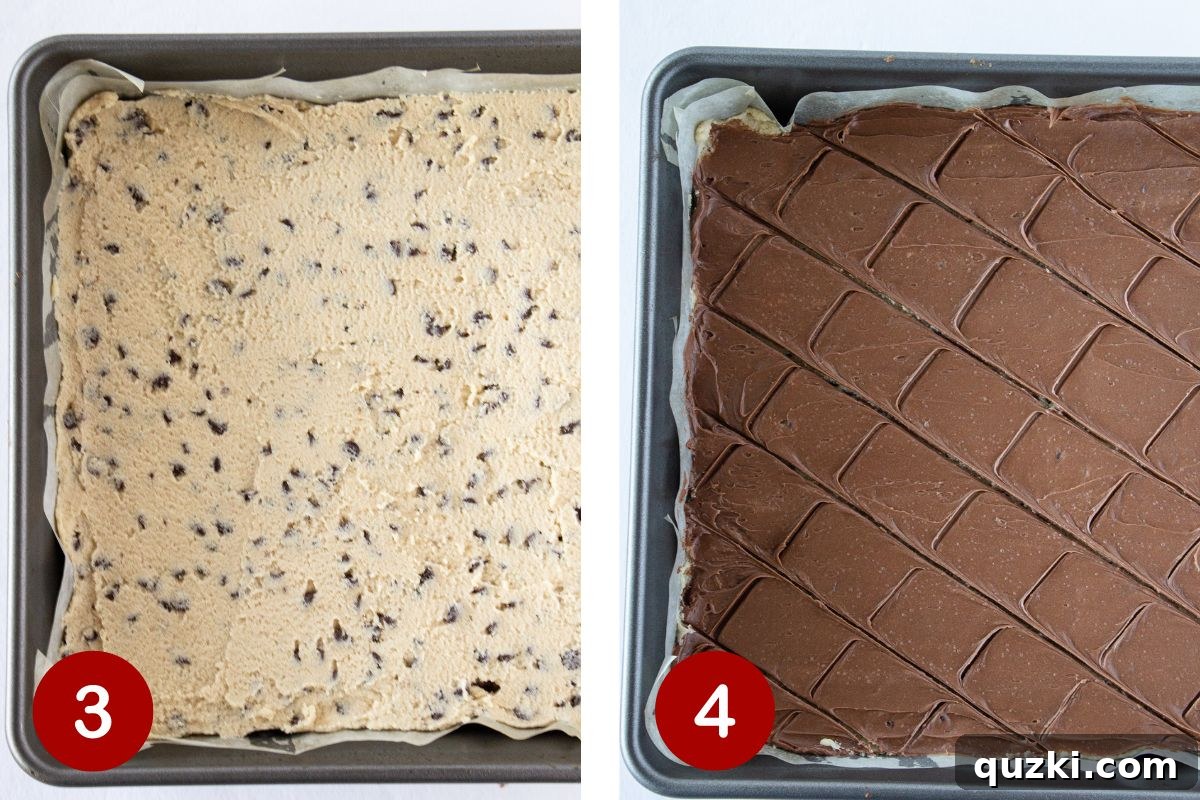
- Layer the Cookie Dough: Carefully spoon the prepared edible cookie dough onto the completely cooled brownie layer. Using an offset spatula or the back of a spoon, gently spread the cookie dough into an even, smooth layer over the brownies. Take your time to ensure it’s perfectly level.
- Apply the Frosting: The final touch is a thin, smooth layer of store-bought milk chocolate frosting. Warm the frosting slightly in the microwave for a few seconds if it’s too firm (be careful not to overheat it). Spread this frosting over the cookie dough layer, creating another even, delicate layer of chocolatey bliss. This adds flavor without overwhelming the other components.
Cutting and Storing Your Brownies
- Chill Before Cutting: For the cleanest cuts, refrigerate the assembled brownies for at least 30 minutes to an hour (or longer) until the layers are firm.
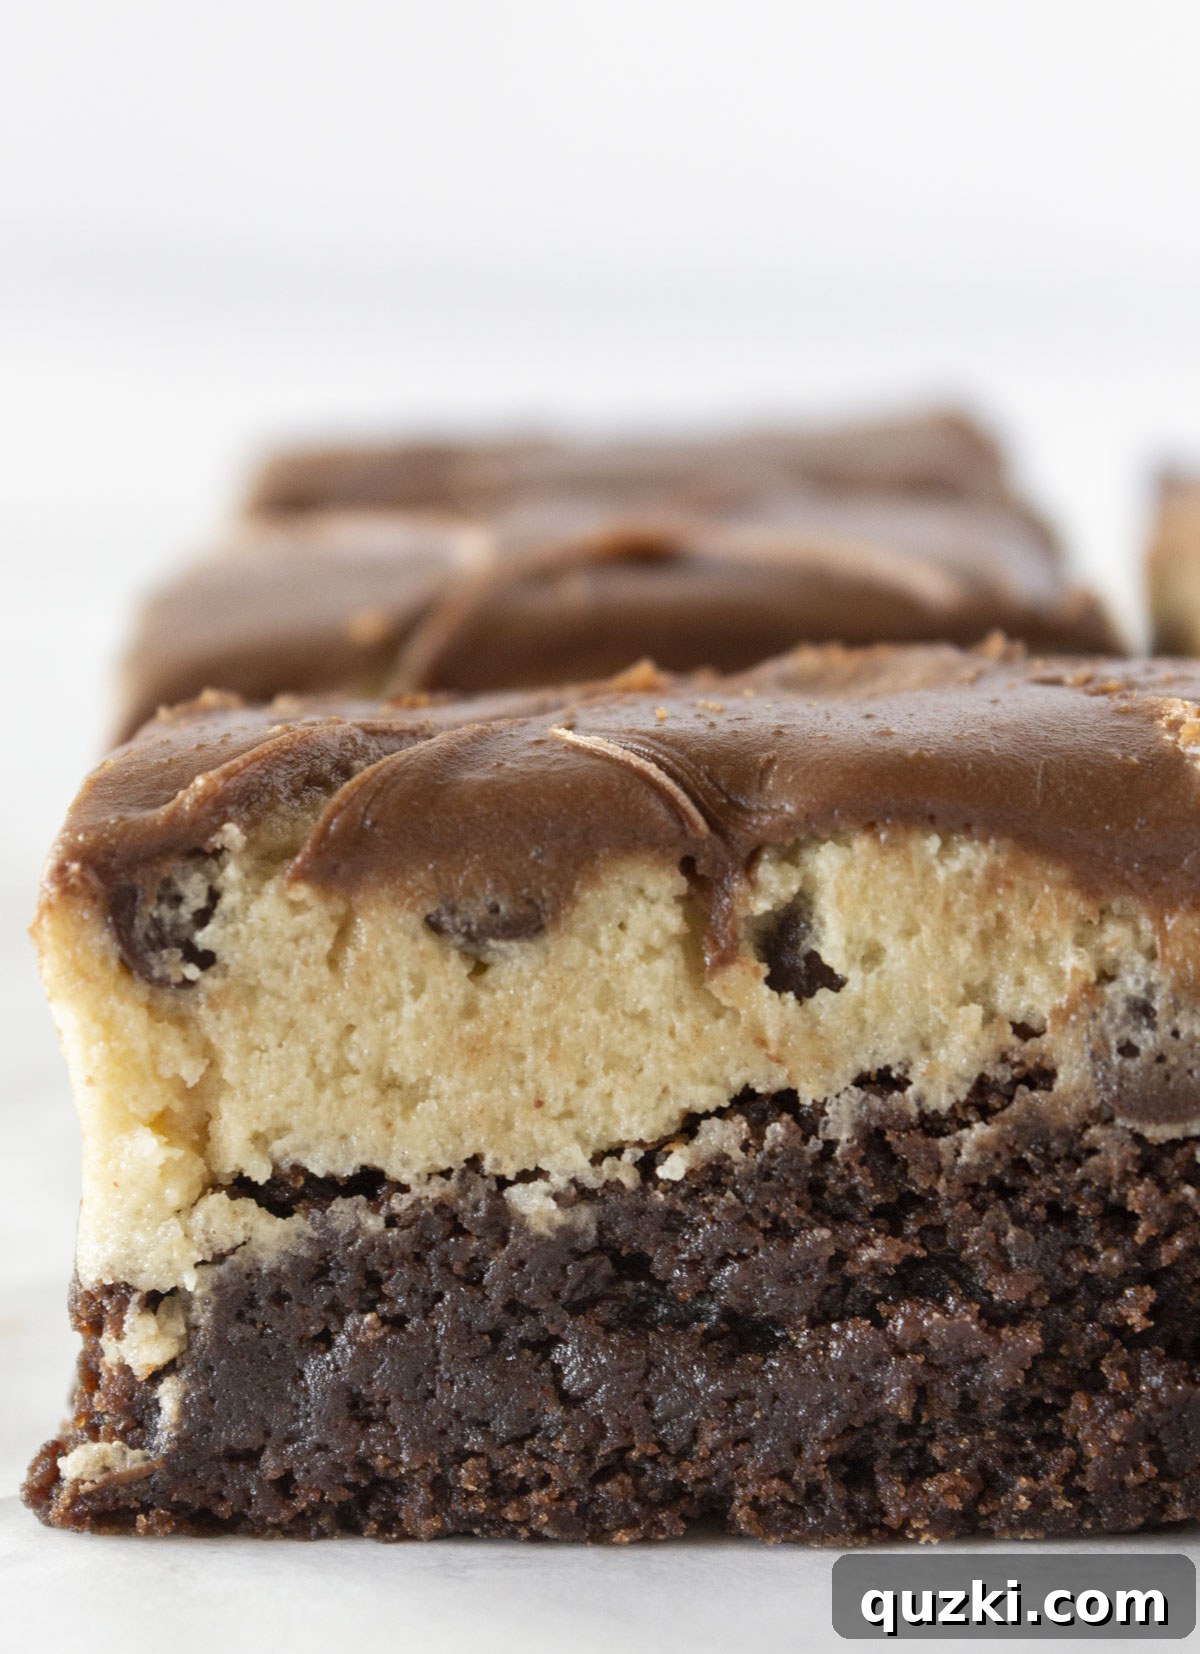
- Slice and Serve: If you used parchment paper, simply lift the entire slab of brownies out of the pan and place it on a cutting board. For the neatest slices, use a plastic knife – its non-stick properties prevent tearing and sticking. Cut into 16 even squares.
- Storage: Store these decadent brownies in an airtight container at room temperature for up to 4 days, or refrigerate them for up to a week for extended freshness. They also freeze exceptionally well for up to 3 months; simply thaw them at room temperature before serving.
And there you have it – a masterpiece of layered indulgence ready to be devoured! Each step, though simple, contributes to the rich flavor and delightful texture that makes these Cookie Dough Brownies truly unforgettable.
Expert Baking Tips for Perfect Cookie Dough Brownies
Achieving bakery-quality Cookie Dough Brownies at home is entirely possible with a few insider tips and tricks. These suggestions will help you elevate your baking game and ensure every batch is as perfect as the last.
- Always Line Your Pan with Parchment Paper: This simple step is a game-changer. By creating a parchment “sling” (leaving extra paper hanging over the edges), you can easily lift the entire cooled slab of brownies out of the pan. This makes cutting into neat, uniform squares incredibly simple and mess-free, preventing any sticky situations or damaged edges. It’s a technique I swear by for all my bar recipes.
- Properly Heat-Treat Your Flour for Edible Cookie Dough: For food safety, it is absolutely crucial to heat-treat the all-purpose flour before incorporating it into your edible cookie dough. Raw flour can harbor bacteria. You can do this by either:
- Microwaving: Place 1 cup of flour in a large microwave-safe bowl. Microwave on high for 1 minute and 15 seconds, stirring thoroughly after every 15-second interval. Ensure the flour reaches an internal temperature of 160°F (71°C) if you have a thermometer. Let it cool completely for at least 5 minutes before adding it to your cookie dough.
- Baking in the Oven: Preheat your oven to 350°F (175°C). Spread 1 cup of flour evenly onto a baking sheet. Bake for 4-5 minutes, stirring every minute, until it also reaches 160°F (71°C). Allow it to cool for at least 5 minutes before use. This step is non-negotiable for safe edible cookie dough.
- Opt for Mini Chocolate Chips in the Cookie Dough: While regular chocolate chips might seem fine, mini chocolate chips are superior for the cookie dough layer. Their smaller size ensures that the chocolate is perfectly distributed throughout the dough, allowing for a balanced flavor and texture in every single bite without overwhelming the creamy dough. If you only have regular-sized chips, roughly chop them into smaller pieces to achieve a similar effect.
- Use a Plastic Knife for Clean Cuts: Once your brownies are completely cooled and the frosting has set, switch from a metal knife to a plastic knife for cutting. Plastic knives are naturally non-stick and glide through the dense layers more smoothly. This prevents the brownies from tearing or sticking to the blade, resulting in beautifully clean and professional-looking squares every time. For even crisper lines, wipe the knife clean between each cut.
- Chill Your Brownies Before Cutting: After assembling all the layers, pop your pan of brownies into the refrigerator for at least 30 minutes to an hour (or even longer) before slicing. Chilling allows all the layers to firm up, making it much easier to achieve those picture-perfect, clean cuts, especially through the fudgy brownie and creamy cookie dough.
- Don’t Overmix the Brownie Batter: Overmixing develops the gluten in the flour, which can lead to tough, cakey brownies. Mix just until the ingredients are combined and no streaks of dry mix remain. A few small lumps are perfectly acceptable and can actually contribute to a chewier texture.
- Experiment with Variations: Feel free to customize! Add a sprinkle of sea salt to the top chocolate frosting for a gourmet touch, or mix in some chopped nuts (like walnuts or pecans) into the brownie layer for added crunch. You could also try different types of chocolate chips in the cookie dough, such as white chocolate or peanut butter chips.
By incorporating these expert tips into your baking routine, you’ll be consistently producing Cookie Dough Brownies that are not only delicious but also flawlessly executed, earning you the admiration of everyone who tries them.
Recipe FAQs
For perfectly fudgy brownies, knowing when to pull them from the oven is key. Look for a few indicators:
First, observe the edges of the brownies. They should appear set and just beginning to pull away from the sides of the pan. The center might still look a little soft, but not liquid.
Second, and most reliably, perform the toothpick test. Insert a toothpick into the center of the brownie. For fudgy brownies, the toothpick should *not* come out completely clean. Instead, it should have moist, fudgy crumbs clinging to it, but no wet batter. If it comes out with liquid batter, it needs more time. If it comes out perfectly clean, your brownies might be on their way to being cakey, so pull them out immediately!
Generally, it’s not recommended to eat raw cookie dough due to the potential presence of harmful bacteria in raw eggs and uncooked flour. However, the cookie dough in *this specific recipe* is entirely safe to eat raw! This is because it is an eggless recipe, and crucially, the all-purpose flour is heat-treated (either microwaved or baked) beforehand to eliminate any harmful bacteria, making it completely safe for consumption. This is why it’s called “edible cookie dough.”
Absolutely! These Cookie Dough Brownies freeze beautifully, making them an excellent make-ahead dessert or a way to store leftovers for future cravings. To freeze, wrap individual brownies or a whole slab tightly in plastic wrap, then place them in an airtight freezer-safe container or bag. They will maintain their quality for up to 3 months. Thaw at room temperature for a few hours before serving.
The wonderful thing about these layered brownies is their excellent shelf life. Stored in an airtight container, they will stay fresh and delicious for up to 4 days at room temperature. If you prefer to extend their freshness, or if your kitchen is particularly warm, you can refrigerate them for up to a full week. Just be sure they are properly sealed to prevent them from drying out.
A dry or cakey brownie is often the result of overbaking or overmixing the batter. Overmixing develops the gluten, leading to a tougher texture. Overbaking removes too much moisture. To prevent this, mix the batter just until combined and follow the toothpick test guidelines carefully to avoid baking for too long. Using melted butter instead of oil, as suggested in this recipe, also helps keep them moist and fudgy.
While this specific recipe uses traditional ingredients, you can adapt it. For gluten-free brownies, use a good quality gluten-free fudge brownie mix and a 1:1 gluten-free all-purpose flour blend (ensure it’s heat-treated) for the cookie dough. For a vegan version, use a vegan brownie mix (if available), vegan butter or margarine, and ensure your chocolate chips and frosting are dairy-free. Remember to check all ingredient labels carefully for hidden animal products.
More Amazing Dessert Recipes to Try…
If you loved these Cookie Dough Brownies and are always on the hunt for delicious, crowd-pleasing desserts, you’re in the right place! Here are a few more fantastic recipes that will satisfy your sweet tooth and impress your guests, many utilizing convenient shortcuts for easy baking.
Indulge in More Sweet Creations
Cakes
Easy Baklava Bundt Cake Recipe with a Cake Mix
Experience the rich, honey-nut flavors of baklava transformed into a convenient and moist bundt cake, made simple with a cake mix. A perfect blend of traditional taste and modern ease!
Desserts
Easy Buckeye Brownie Cookies
If you love the classic chocolate and peanut butter combination, these Buckeye Brownie Cookies are a must-try. Fudgy brownie cookies with a creamy peanut butter center – an absolute dream!
Cake Mix Cookies
Easy Lemon Curd Cookies Recipe
Brighten your day with these delightful Lemon Curd Thumbprint Cookies! Made effortlessly with a cake mix, they feature a buttery base and a tangy lemon curd filling, perfect for spring or summer.
Cakes
Texas Sheet Cake Bundt Cake Recipe
Enjoy the classic flavors of a beloved Texas Sheet Cake in a more elegant bundt cake form. This moist chocolate cake with a rich pecan frosting is perfect for any gathering.
Did you try this recipe?
Leave a ⭐ review below and tag @practicallyhomemade on Pinterest!
⭐
⭐
⭐
⭐
Ultimate Cookie Dough Brownies
June Albertson-Dick
20
40
1
2
16 brownies
Rate Recipe
Print Recipe
Ingredients
Brownie Layer
- 1 box fudge brownie mix (approx. 18-20 oz)
- 1/2 cup unsalted butter, {melted}
- 2 large eggs
- 3 tbsp milk (any type)
Edible Cookie Dough Layer
- 3/4 cup unsalted butter or margarine, {softened, margarine preferred for flavor}
- 1/2 cup granulated sugar
- 1/2 cup light brown sugar
- 1/2 tsp vanilla extract
- 1 cup all-purpose flour, {heat-treated for safety, see notes below*}
- 1/2 cup mini semi-sweet chocolate chips
Top Layer
- 1/4 cup store-bought milk chocolate frosting
Instructions
Brownie Layer
-
Preheat the oven to 350°F (175°C). Prepare a 9×9 inch baking pan by either spraying liberally with nonstick cooking spray or lining it completely with parchment paper, leaving an overhang on two sides to create a “sling.”
-
In a medium bowl, combine the fudge brownie mix, melted butter, eggs, and milk. Mix with a hand-held mixer (or by hand with a sturdy spatula) until everything is just combined and no dry spots remain. Do not overmix.
-
Pour the brownie batter into the prepared 9×9 inch pan and spread into an even layer using a spatula. Bake for 37-40 minutes, or until the brownie has a shiny layer on top, the edges are set, and a toothpick inserted near the center comes out with moist, fudgy crumbs (not wet batter). Remove from the oven and allow the brownies to cool completely on a wire rack. This is crucial before proceeding.
Edible Cookie Dough Layer
-
Once the brownies are cooled, prepare the edible cookie dough. First, heat-treat your all-purpose flour (see notes below* for instructions on how to microwave or bake the flour to ensure it’s safe to eat). Allow it to cool completely. In a medium bowl, cream together the softened butter/margarine, granulated sugar, brown sugar, and vanilla extract using an electric mixer until light and fluffy. Add the cooled, heat-treated flour and mix until a thick dough forms. Finally, add the mini semi-sweet chocolate chips and stir them into the dough until evenly distributed.
Assembling and Finishing the Cookie Dough Brownies
-
Carefully spoon the prepared edible cookie dough over the completely cooled brownie layer. Using an offset spatula or the back of a spoon, gently spread the cookie dough into an even, smooth layer across the brownies. Next, take the store-bought milk chocolate frosting and spread a thin, even layer over the cookie dough. This adds another dimension of flavor without being overpowering.
-
For the cleanest cuts, refrigerate the assembled brownies for at least 30 minutes to an hour until the layers are firm. When ready to cut, if you used parchment paper, lift the entire slab of brownies out of the pan and place it on a cutting board. Use a plastic knife for clean, non-stick slicing, wiping the blade between cuts if necessary. Store the brownies in an airtight container at room temperature for up to 4 days, or refrigerate for up to a week. These brownies also freeze wonderfully for up to 3 months.
Notes
Microwave Method: Place 1 cup of all-purpose flour in a large microwave-safe bowl. Microwave on high for 1 minute and 15 seconds, stirring thoroughly after every 15-second interval, until the flour reaches an internal temperature of 160°F (71°C). Cool completely for at least 5 minutes before adding to the Edible Cookie Dough.
Oven Method: Preheat the oven to 350°F (175°C). Spread 1 cup of all-purpose flour evenly onto a cookie sheet. Cook for 4-5 minutes, stirring every minute, until it reaches an internal temperature of 160°F (71°C). Cool for at least 5 minutes before adding to the Edible Cookie Dough.
- Line the pan with parchment paper: This allows you to easily remove the entire pan of brownies at one time, which greatly helps in cutting them into perfect, even squares.
- Chop regular-sized chocolate chips: If you’re using regular-sized chocolate chips instead of mini ones for the cookie dough, chop them down into smaller pieces. This ensures perfect proportions of chocolate in every bite and a better texture.
- Use a plastic knife for cutting: For nice, clean brownie squares that don’t tear or stick, use a plastic knife. Its natural nonstick properties work much better than a metal knife, especially with the soft layers.
- Chill before cutting: Refrigerate the assembled brownies for at least 30 minutes to an hour before slicing. This firms up all the layers, resulting in much cleaner and more precise cuts.
Nutrition
Serving:
1
brownie
,
Calories:
413
kcal
,
Carbohydrates:
50
g
,
Protein:
4
g
,
Fat:
22
g
,
Saturated Fat:
12
g
,
Polyunsaturated Fat:
1
g
,
Monounsaturated Fat:
7
g
,
Trans Fat:
1
g
,
Cholesterol:
59
mg
,
Sodium:
225
mg
,
Potassium:
83
mg
,
Fiber:
1
g
,
Sugar:
34
g
,
Vitamin A:
481
IU
,
Calcium:
23
mg
,
Iron:
2
mg
Nutrition information is automatically calculated, so should only be used as an approximation.
Loved this recipe? Leave a comment below!
Your feedback helps us create more delicious content for you.