
Mastering Salami Roses: Two Easy Methods for Stunning Charcuterie Boards
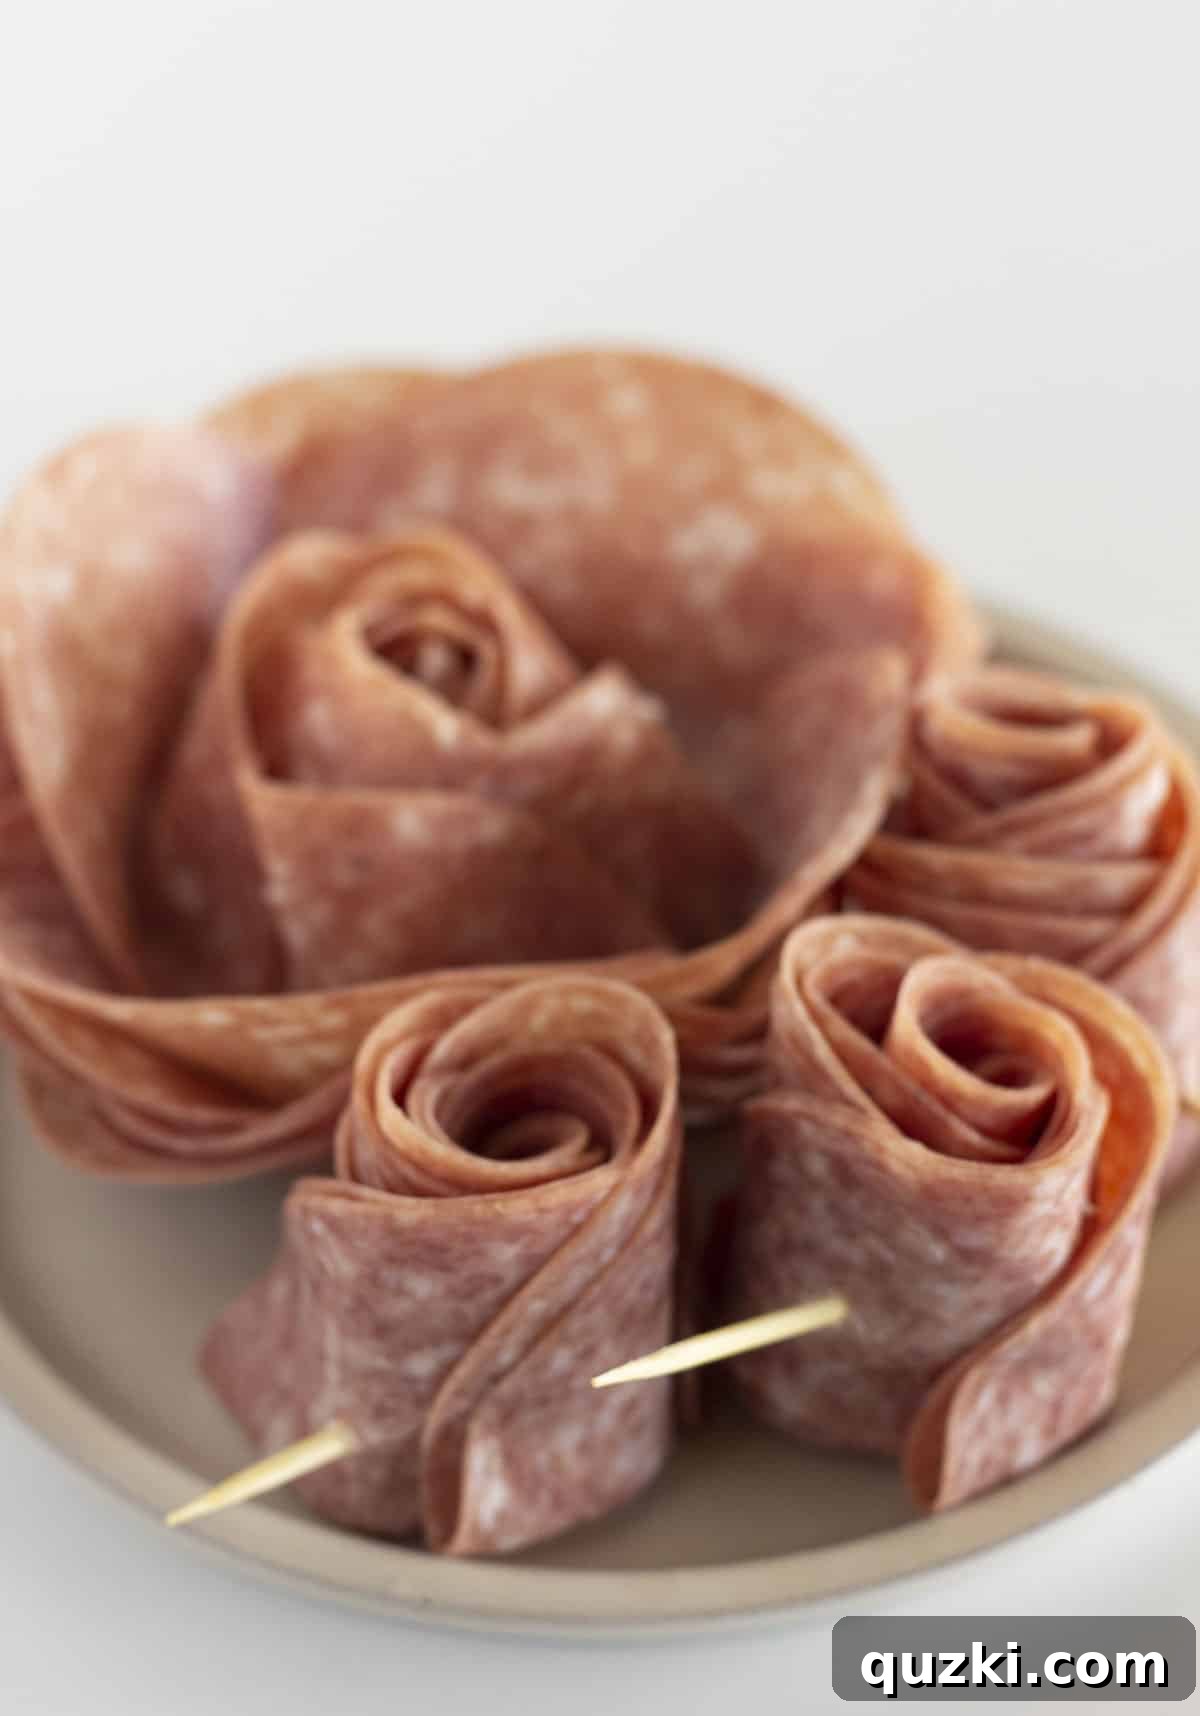
As a co-owner of a charcuterie business, my sister and I have crafted countless boards, and one element consistently steals the show: the exquisite **salami rose**. These edible flourishes aren’t just decorative; they add captivating height, intriguing texture, and a unique visual elegance that instantly elevates any charcuterie spread. What’s truly remarkable is how straightforward they are to create, transforming a simple ingredient into a sophisticated centerpiece. If you’ve ever admired these meaty blossoms and wondered how to replicate them, you’re in the right place. This comprehensive guide will walk you through two foolproof methods to create perfect salami roses, ensuring your next charcuterie board is nothing short of spectacular.
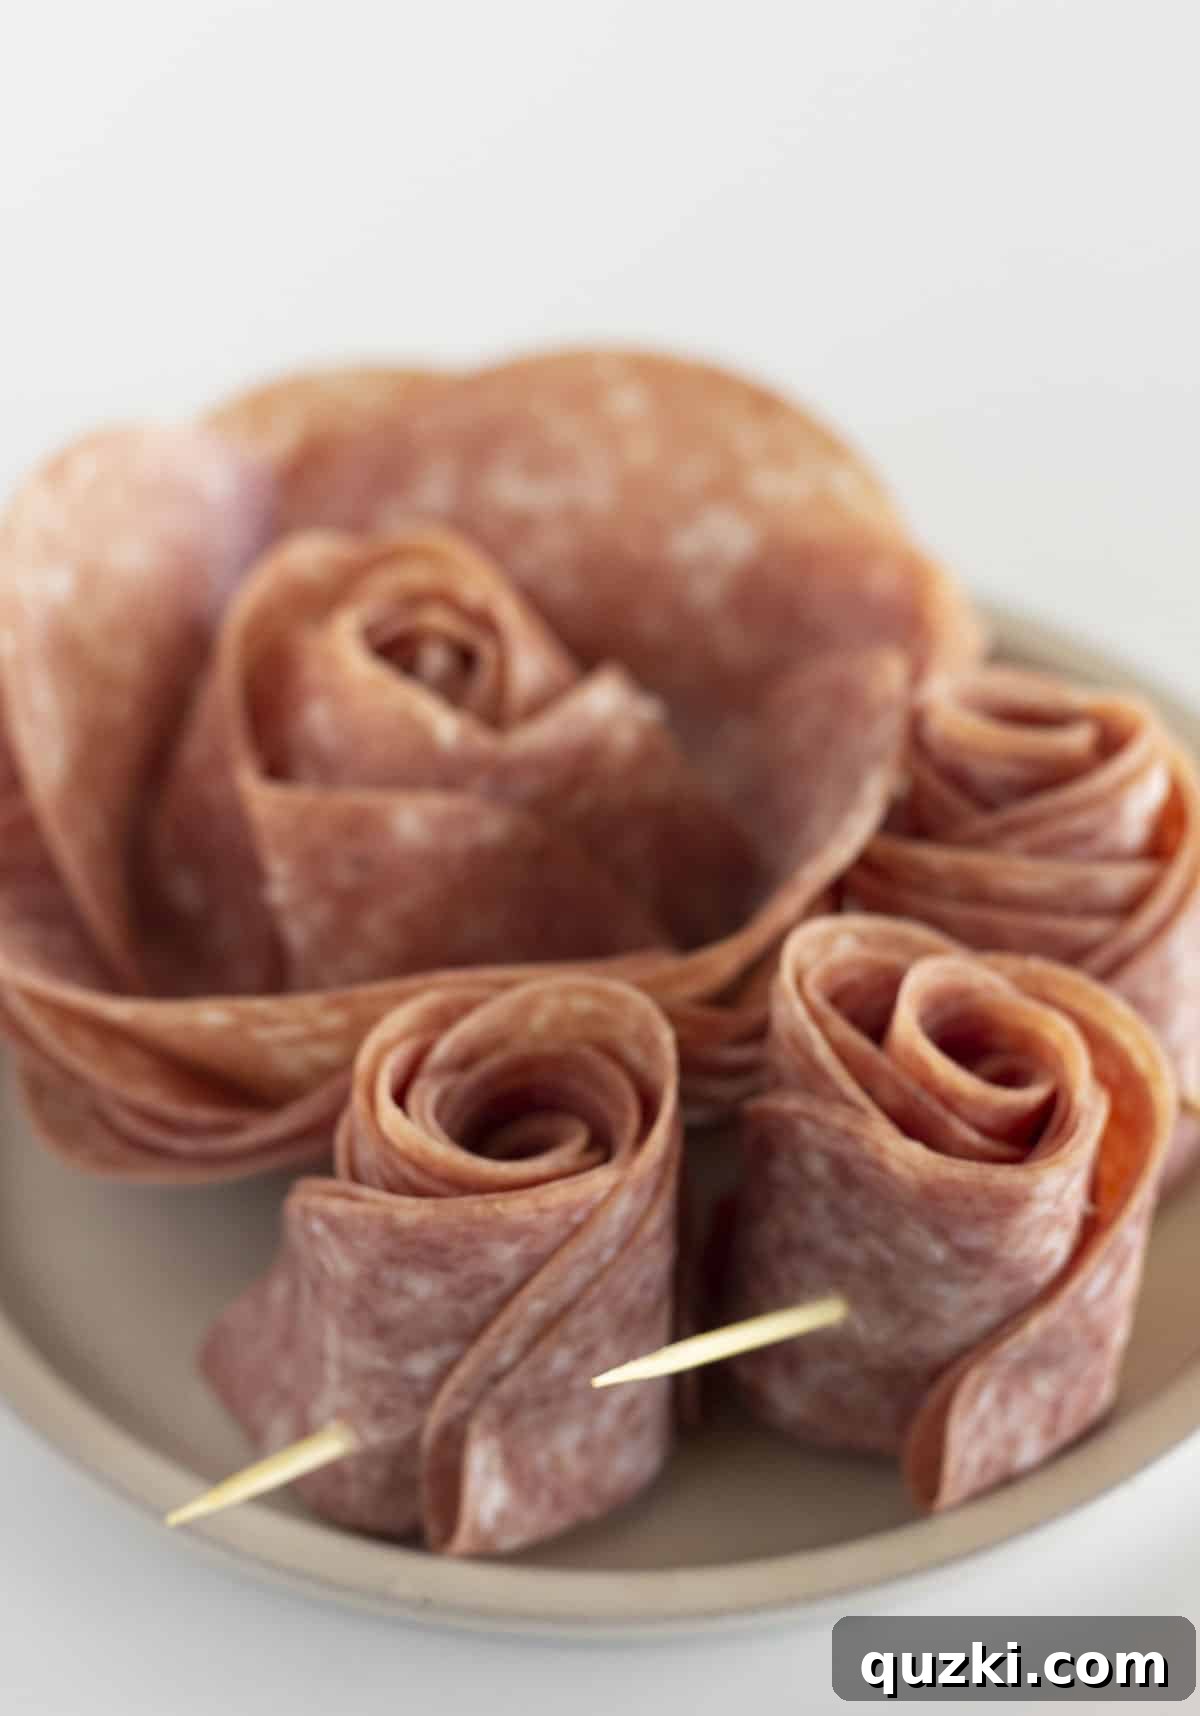
Table of Contents
- The Art of Charcuterie Presentation: Why Salami Roses Matter
- Essential Ingredients for Perfect Salami Roses
- Method 1: Crafting Salami Roses with a Glass
- Method 2: Rolling Salami Roses for Smaller Accents
- Expert Tips for Stunning Salami Roses
- Frequently Asked Questions About Salami Roses
- Incorporating Salami Roses into Your Spreads
- Salami Rose (for Charcuterie) Recipe
The Art of Charcuterie Presentation: Why Salami Roses Matter
In the world of charcuterie, presentation is paramount. A beautifully arranged board doesn’t just offer delicious bites; it tells a story, invites exploration, and delights the eye as much as the palate. Salami roses are a simple yet impactful way to elevate your board from delicious to truly unforgettable. They break up the flatness of horizontally laid meats and cheeses, adding a dynamic, three-dimensional element that captures attention. Whether you’re assembling a cozy board for a small family gathering or a lavish spread for a grand celebration, these sculpted meat flowers create an immediate sense of artistry and care. They signal to your guests that every detail has been thoughtfully considered, making the entire experience feel more polished and professional. It’s this effortless touch of elegance that makes salami roses a staple in almost every charcuterie creation we design.
Essential Ingredients for Perfect Salami Roses
Creating stunning salami roses requires surprisingly few ingredients, making them an accessible garnish for any home entertainer. The star of the show is, of course, **pre-sliced salami**. The key here is “pre-sliced” and “thinly cut.” Slices that are too thick will be difficult to mold and won’t hold their delicate petal shape effectively. While salami is the traditional choice, the technique is versatile enough to be applied to a variety of other deli meats, offering a range of flavors and aesthetics for your board.
Consider these excellent alternatives, provided they are sliced thin:
- **Prosciutto:** Offers a more delicate texture and a salty, nuanced flavor. Its natural translucence can create beautiful, airy petals.
- **Pepperoni:** Perfect for smaller, spicier roses, ideal for pizza-themed boards or adding a kick.
- **Turkey or Ham:** For a lighter, milder flavor profile, these options work wonderfully and can cater to different dietary preferences.
- **Roast Beef:** Adds a robust, savory note and a darker color contrast to your arrangement.
For a truly uniform and professional look, especially when working with larger deli meats that might come in irregular shapes, a round cookie cutter can be an invaluable tool. By cutting down larger slices to a consistent size, you ensure that all your “petals” are perfectly matched, contributing to a more cohesive and visually appealing rose. This small step can make a big difference in the final presentation of your meat flowers.
Method 1: Crafting Salami Roses with a Glass
This method is often the first one people learn, and for good reason—it leverages an everyday kitchen item (a glass!) to achieve a consistently beautiful result. It’s an ingenious technique that allows you to easily control the size and fullness of your roses simply by changing the size of the glass you use. This versatility makes it perfect for creating a dynamic display with various rose sizes on your board.
Choosing Your Glass
The size of your glass directly dictates the size of your finished salami rose. For creating charming, petite flowers ideal for smaller boards or as delicate accents, opt for a shot glass or a slender champagne flute. If you’re aiming for a dramatic, large-scale salami rose to serve as a focal point, a wider wine glass or a small tumbler will yield a more substantial bloom. Ensure the glass rim is clean and smooth for optimal results.
Step-by-Step Guide
-
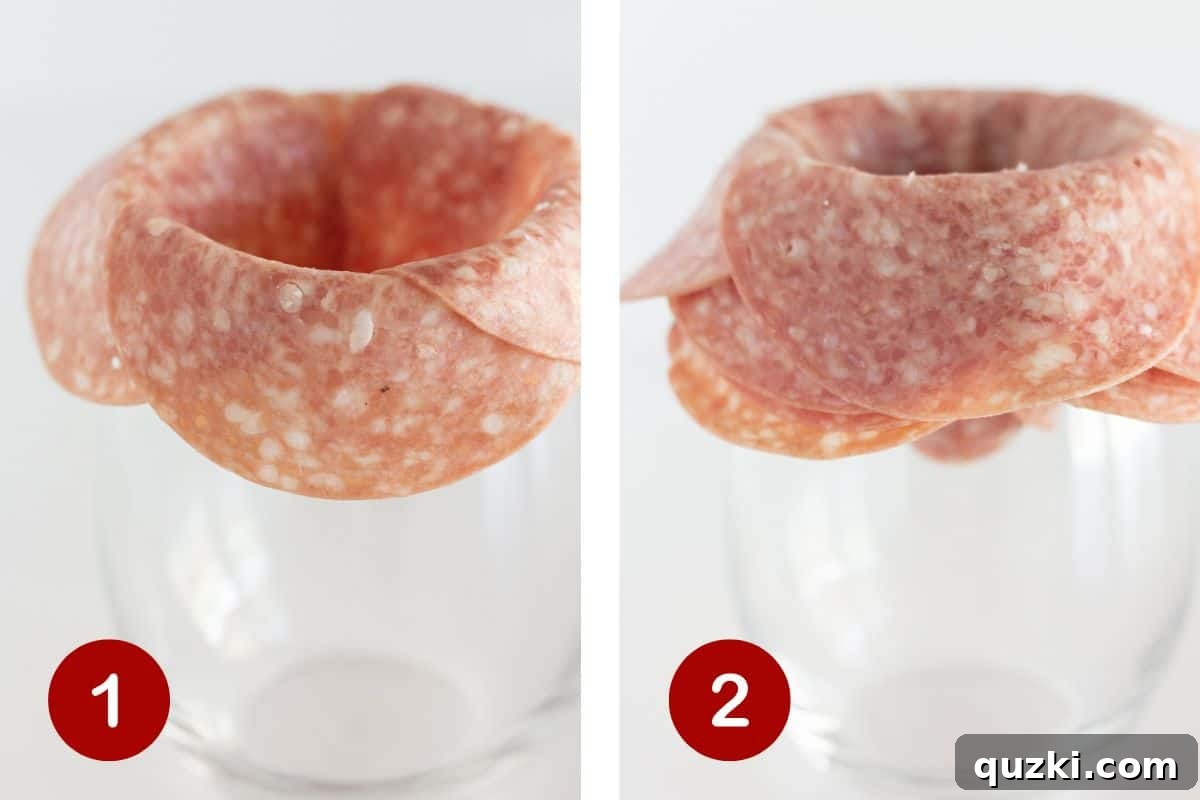
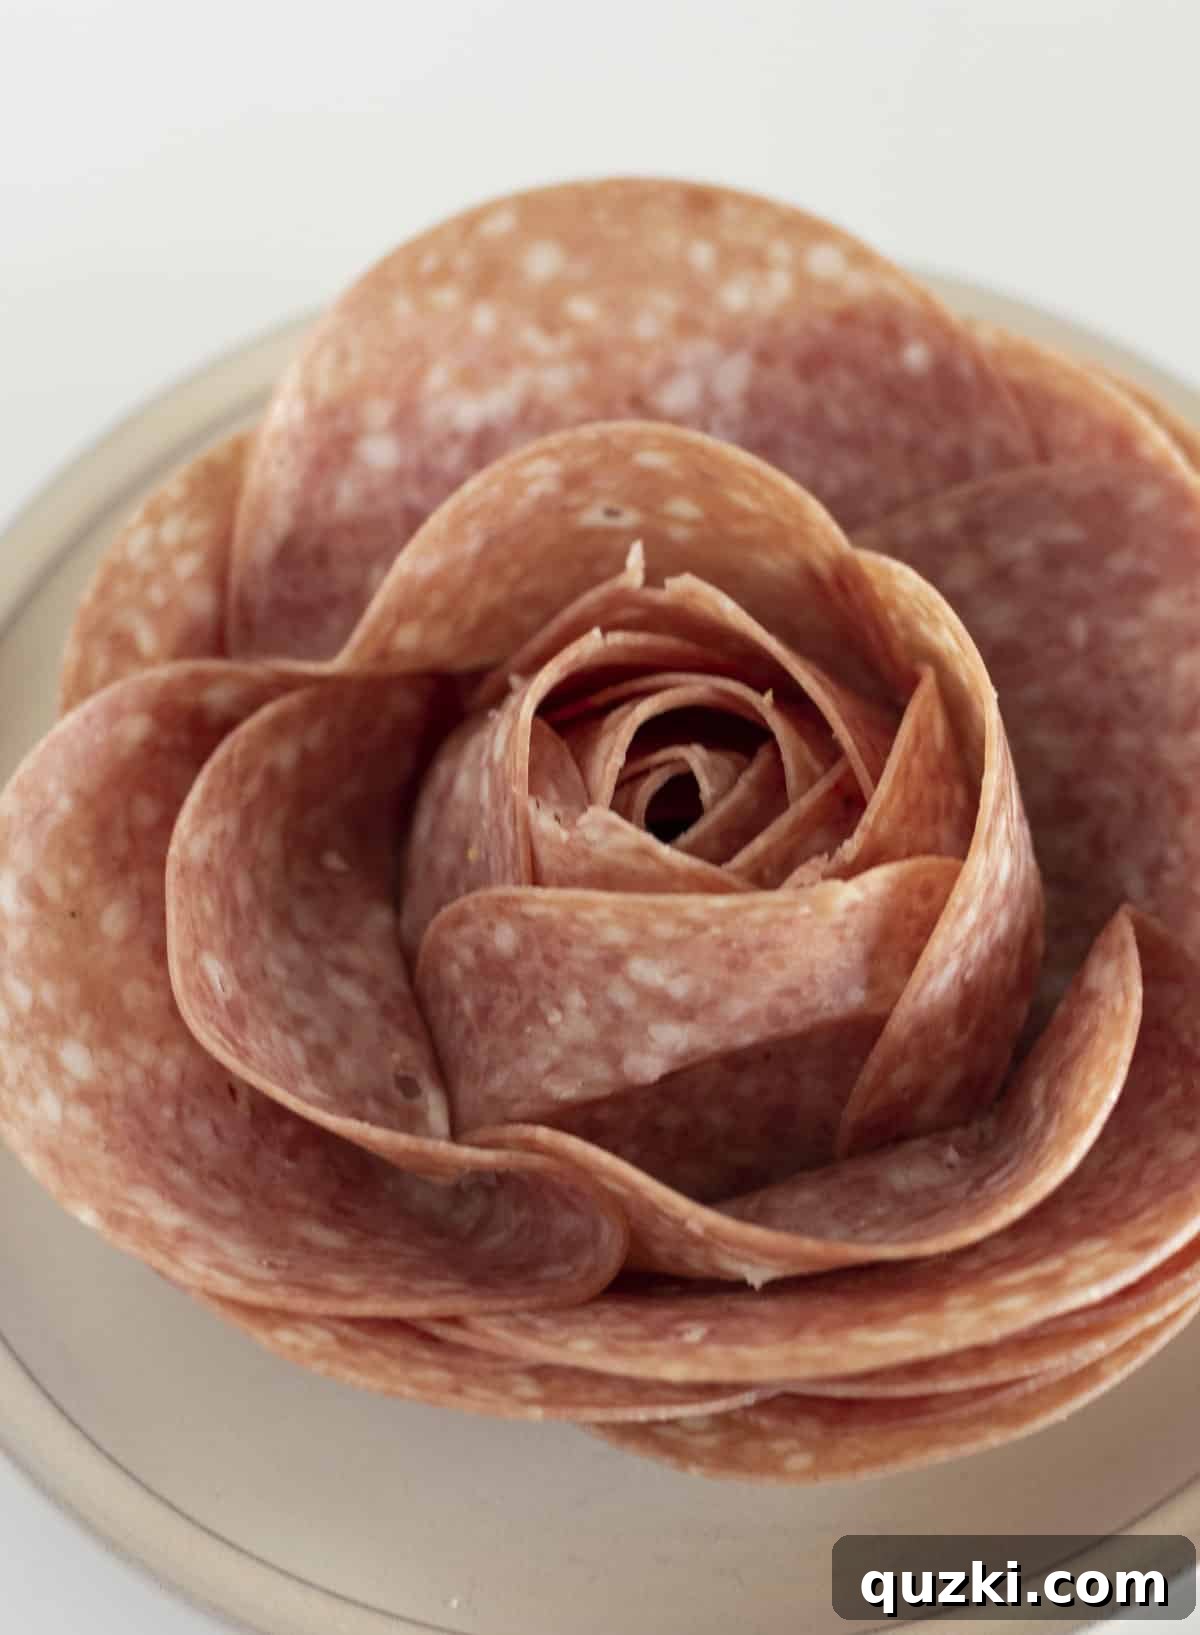
Forming the First Layer: Take your first slice of salami and fold it neatly in half. Place the folded salami over the rim of your chosen glass, ensuring that roughly half of the salami hangs inside the glass and the other half drapes over the outside. This creates the initial structure. Continue adding slices, overlapping each new piece by about 1/4 to 1/2 inch. This careful overlap is crucial as it mimics the natural layering of flower petals, building density and a continuous appearance. Proceed around the entire rim until it is completely covered with a ring of overlapping salami slices.
-
Building Subsequent Layers: Once the first layer is complete, begin constructing your second layer. Use the exact same overlapping process, placing new folded slices slightly further down the rim, or tighter towards the center, depending on whether you want a wider or more compact rose. Continue adding layers of salami, typically aiming for 6-9 layers in total. The more layers you add, the fuller and more voluminous your salami rose will be, giving it a lush, abundant look. Observe the layers as you build them, adjusting the overlap to create a realistic, blooming effect.
-
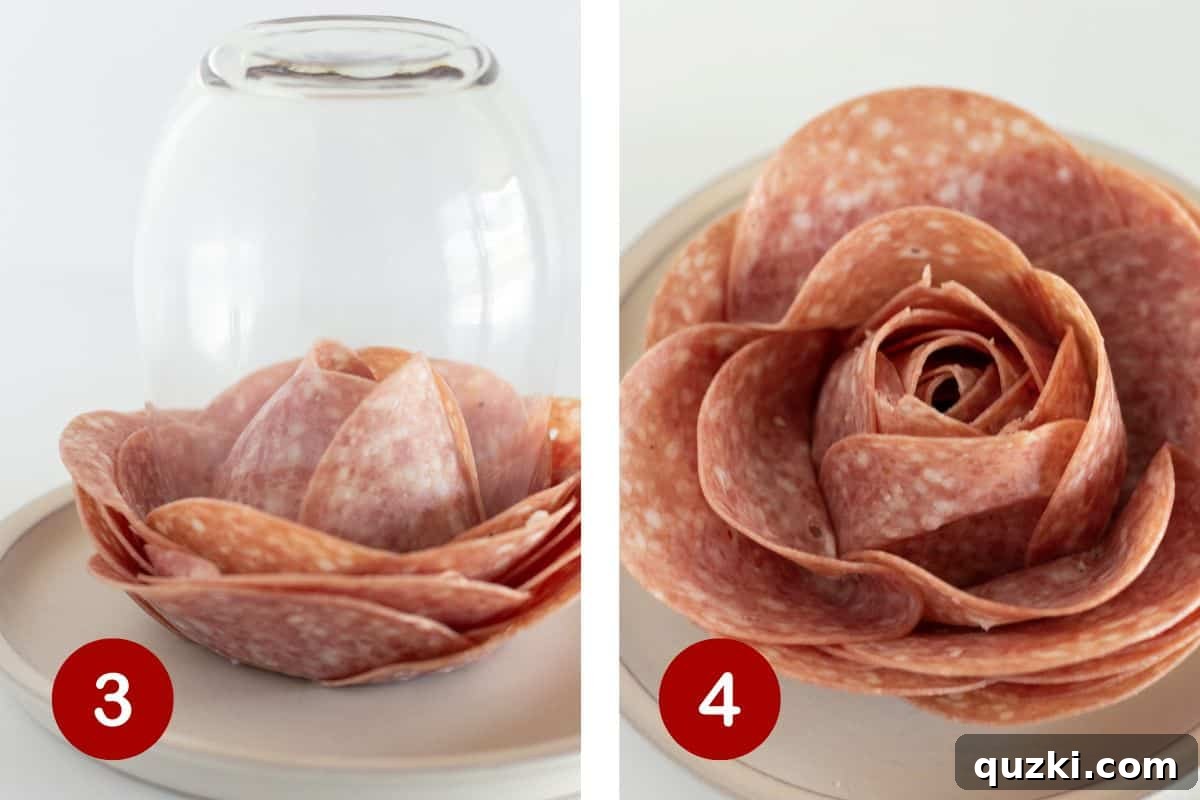
The Grand Reveal: Once you’ve achieved your desired number of layers and the rose appears full and symmetrical, it’s time for the magical flip. Place a small, flat plate or your charcuterie board directly over the opening of the glass, securing it firmly. With a swift yet controlled motion, carefully turn the glass upside down onto the plate or board. The salami will gently settle into a perfectly formed rose shape. Gently and slowly lift the glass away, allowing the meat petals to unfurl slightly and hold their new form. The anticipation of this step is always a highlight!
-
Immediate Use or Storage: Your beautiful salami rose is now ready for display! You can place it directly onto your charcuterie board, nestled among cheeses, fruits, and crackers. If preparing ahead, cover the rose (still on its plate or board, or gently transfer to an airtight container) tightly with plastic wrap to prevent drying out, and refrigerate for up to 2 days. This makes pre-assembly for events incredibly convenient.
Method 2: Rolling Salami Roses for Smaller Accents
While the glass method is fantastic for larger, more robust roses, the rolling technique is ideal for creating smaller, more delicate meat rosettes. These tiny blossoms are perfect for filling in gaps on a board, adding small bursts of color and texture, or for individual charcuterie cups. This method is incredibly simple and requires only one additional tool: a toothpick to hold the finished creation together.
The Rolling Technique
-
Laying the Foundation: Begin by folding 5-10 slices of salami in half. The number of slices will determine the fullness of your rolled rose. Lay your first folded salami slice down flat. Then, add the subsequent folded slices in a long, slightly overlapping line. Each new piece should be placed so that its folded edge slightly overlaps the middle of the previous piece. This creates a staggered row that, when rolled, will form the petal layers of your rose. Ensure a consistent overlap to achieve an even bloom.
-
Rolling and Securing: Starting from the first salami slice you laid down, begin to carefully and tightly roll the entire line of meat. Roll it as snugly as possible to ensure the rose holds its shape. Once you reach the end of your salami line, secure the rolled rose by inserting a toothpick through its base. The toothpick will act as a stem, keeping all the ‘petals’ in place. You can use standard wooden toothpicks, or for a fancier touch, consider decorative cocktail picks.
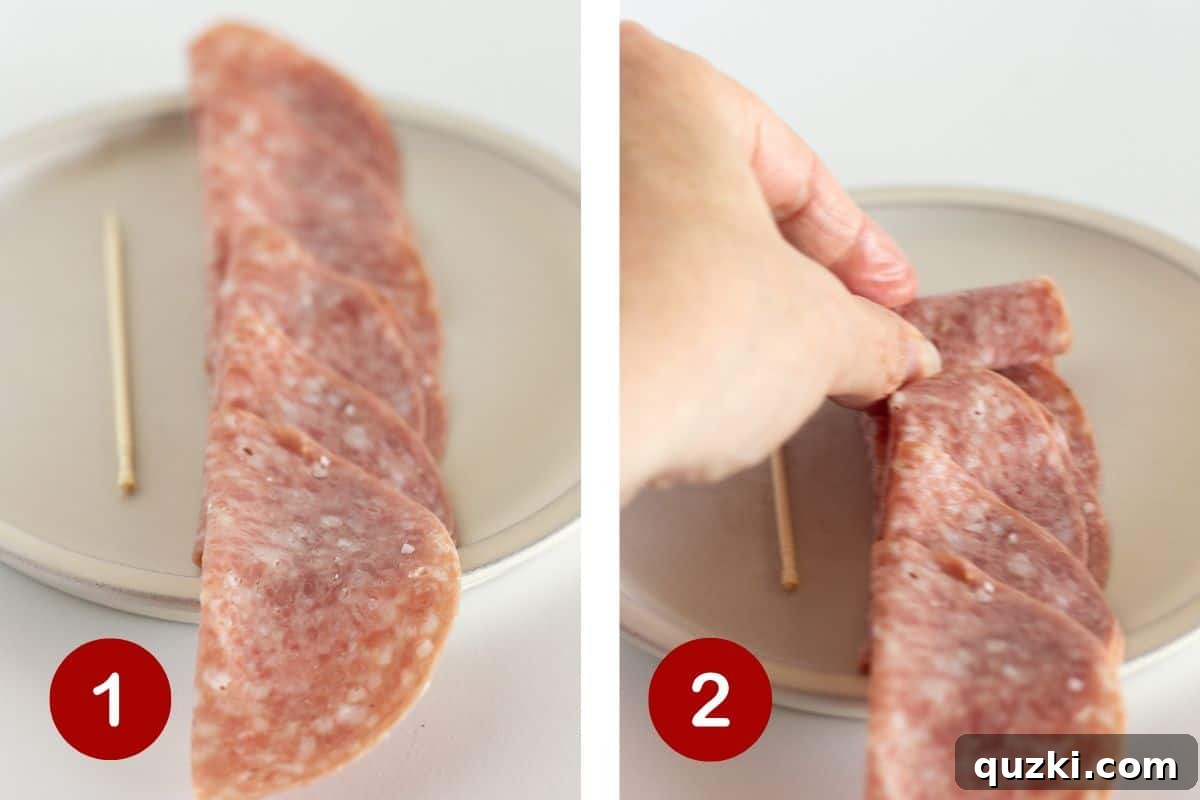
Perfecting the Mini Rose
These smaller, rolled roses are fantastic for adding delicate touches. They can be nestled between larger cheese blocks, used to garnish individual appetizers, or simply dotted around your board for visual interest. The toothpick also offers a convenient way for guests to pick them up.
Expert Tips for Stunning Salami Roses
- Shape Retention is Key: When using the glass method, gently press and hold the salami slices against the rim of the clean glass. This encourages the meat to take on the curved shape of the glass, which is vital for the rose to hold together gracefully once flipped. A little initial pressure ensures structural integrity.
- Variety is the Spice of Life: Don’t limit yourself to just one type of salami or one size of glass. Experiment with various diameters of glasses to create an appealing array of rose sizes. Mix different meats like prosciutto, pepperoni, or even thinly sliced roast beef for a delightful contrast in color, flavor, and texture. This diversity adds tremendous visual appeal and culinary excitement to your charcuterie board, turning a simple snack into a gourmet experience.
- Optimal Storage for Freshness: The best way to store your glass-formed salami roses, especially if making them in advance, is to keep them on the glass. Once the rose is formed, if it’s still on the glass, simply cover the entire glass (with the rose on top) tightly with plastic wrap or transfer it to an airtight container. Refrigerate until ready to use. This method helps maintain its shape and freshness for up to 2 days.
- Creative Pairings on a Toothpick: Enhance your rolled salami roses by adding a complementary element to the toothpick. A mini brie bite or a small cube of fresh melon (like cantaloupe or honeydew) pierced onto the same toothpick as the salami rose adds an unexpected burst of flavor and a lovely textural contrast. This is a fantastic way to introduce a fun, interactive twist for your guests.
- Temperature Matters: For the easiest handling and best shape retention, ensure your deli meats are slightly chilled, but not frozen solid. Room temperature meats can be too pliable and may not hold their folds as well.
- Color and Garnish: Think about the overall color palette of your board. Darker salami roses can create a dramatic contrast with lighter cheeses or fruits. Consider adding small sprigs of fresh rosemary or thyme nearby to mimic rose stems or leaves, enhancing the floral illusion.
Frequently Asked Questions About Salami Roses
The number of salami slices needed can vary significantly based on the desired size and fullness of your rose, as well as the size of your glass or the rolling method used. For a smaller, more delicate rose, you might use approximately 10-15 slices. For a large, luscious, and full-bodied rose created with the glass method, expect to use anywhere from 20 to 26 slices of salami to achieve that impressive volume and petal depth.
Absolutely! Preparing your salami roses in advance is a fantastic time-saver, making the final assembly of your charcuterie board much more relaxed and enjoyable. We highly recommend making them a few hours to a full day before your event. This allows the meat to “set” in its rose shape and frees up valuable time on the day of your gathering for other preparations. Remember to store them properly, as outlined in our expert tips, to maintain their freshness and shape.
Yes, pepperoni roses are definitely possible and highly popular, especially for boards with an Italian or pizza theme! The technique remains the same as with salami. However, due to pepperoni’s typically smaller diameter, you will likely need to adjust by using a smaller glass (like a shot glass or a small espresso cup) for the glass method, or fewer slices for the rolling method, to ensure the proportions are right for a well-formed rose.
For the most impactful and easily formed roses, we generally recommend using larger-sized salami slices. These provide more “petal” surface area, making it easier to create fuller, more dramatic blooms. However, the beauty of this technique is its adaptability: you can effortlessly adjust the final size of each meat flower by simply changing the diameter of the glass you use. Smaller glasses yield smaller roses, and larger glasses create more substantial ones, regardless of the initial salami slice size (within reason).
While they are a staple on charcuterie boards, salami roses are incredibly versatile! They can also be used to garnish salads, create decorative elements on sandwich platters, or even as a unique topping for gourmet pizzas. Their attractive appearance makes them suitable for any dish where a touch of elegance and savory flavor is desired.
Incorporating Salami Roses into Your Spreads
Now that you’ve mastered the art of creating beautiful salami roses, it’s time to integrate them into your culinary masterpieces! These versatile meat flowers are not only fantastic as standalone garnishes but also blend seamlessly into a variety of themed charcuterie boards and appetizer platters. They provide a vital element of visual interest and texture, transforming an ordinary spread into an extraordinary feast for the eyes.
Discover inspiration and practical ideas for incorporating your newly crafted salami roses into stunning arrangements. Try these recipes for your next gathering:
More Charcuterie Board Inspiration
Appetizers
How to Create a Simple Summer Charcuterie Board
Christmas
How to make a Festive Christmas Charcuterie Board
Appetizers
How to make Easy DIY Charcuterie Boxes
Appetizers
How to Create an Epic Fall Charcuterie Board
Did you try this recipe? Leave a ⭐⭐⭐⭐⭐ review below and tag @practicallyhomemade on Pinterest!
⭐
⭐
⭐
⭐
Salami Rose (for Charcuterie)
June Albertson-Dick
Adding a salami rose to a charcuterie board is an effortless way to elevate its presentation. This recipe shows you two easy methods to create impressive, edible flowers that will delight your guests.
5 mins
0 mins
5 mins
4 servings
Rate Recipe
Print Recipe
Ingredients
Instructions
How to make one with a Glass
-
Fold the first slice of salami in half and place it over the rim of the glass, with half inside and half outside. Continue adding slices, overlapping by 1/4-1/2 inch, until the rim is covered for the first layer.
Add a second layer using the same overlapping process. Keep adding layers of salami until you have 6-9 layers, or until your rose reaches the desired fullness.
Once all layers are added, carefully turn the glass upside down onto a small plate or your charcuterie board. Gently remove the glass to reveal a perfectly formed rose shape.
Use the salami rose immediately or cover it with plastic wrap and refrigerate for up to 2 days.
How to make one by Rolling
-
Fold 5-10 slices of salami in half. Place the first one down, then arrange the others in a long, overlapping line, with each piece added to the middle of the one before it.
Starting with the first salami slice, begin to roll the entire line of meat tightly. Once rolled, use a toothpick to secure the rose from the bottom, ensuring it holds its shape.
Video
Notes
- For best results, press and hold the salami over the edge of the glass so it takes its shape, ensuring the rose stays together nicely.
- Create a diverse display by using a variety of glass sizes and different types of deli meats to make an array of roses. This adds fantastic texture, flavor, and visual interest to your board.
- Consider adding a mini brie bite or a small cube of melon onto the toothpick of a rolled rose for a delightful sweet and savory twist.
- Prosciutto, pepperoni, turkey, ham, and roast beef are all excellent meat options. The key is that they must be sliced thin. For consistency, cut larger deli slices with a round cookie cutter.
- Salami roses can be prepared up to 2 days in advance. Store them covered tightly in plastic wrap in the refrigerator.
Nutrition
Calories: 137 kcal,
Carbohydrates: 1 g,
Protein: 8 g,
Fat: 11 g,
Saturated Fat: 4 g,
Polyunsaturated Fat: 1 g,
Monounsaturated Fat: 5 g,
Cholesterol: 27 mg,
Sodium: 763 mg,
Potassium: 128 mg,
Calcium: 4 mg,
Iron: 0.4 mg
Nutrition information is automatically calculated, so should only be used as an approximation.
Enjoyed this recipe? Share your thoughts!
Leave a comment below to let us know how your salami roses turned out!
Conclusion: Elevate Your Entertaining
Creating beautiful salami roses is a simple yet incredibly effective way to transform any charcuterie board into a work of art. As co-owners of a charcuterie business, we’ve seen firsthand how these delicate meat flowers captivate guests and add that unforgettable touch of elegance. Whether you choose the reliable glass method for a fuller bloom or the quick rolling technique for smaller accents, you now have the skills to craft these stunning edible garnishes with confidence. Don’t shy away from experimenting with different meats, sizes, and pairings to truly make your spreads unique.
We hope this detailed guide has inspired you to try your hand at making salami roses for your next gathering. With a little practice, you’ll be creating charcuterie masterpieces that are not only delicious but also visually spectacular. Get ready to impress your friends and family with your newfound artistry!